Revision and Notes
Date | Owner | Revision | Notes | ||||||
|---|---|---|---|---|---|---|---|---|---|
| 1.0 | Initial release | |||||||
Table of Contents |
| ||||||||
Introduction
The following quick start guide provides background information about the SolidSense N8 Compact.
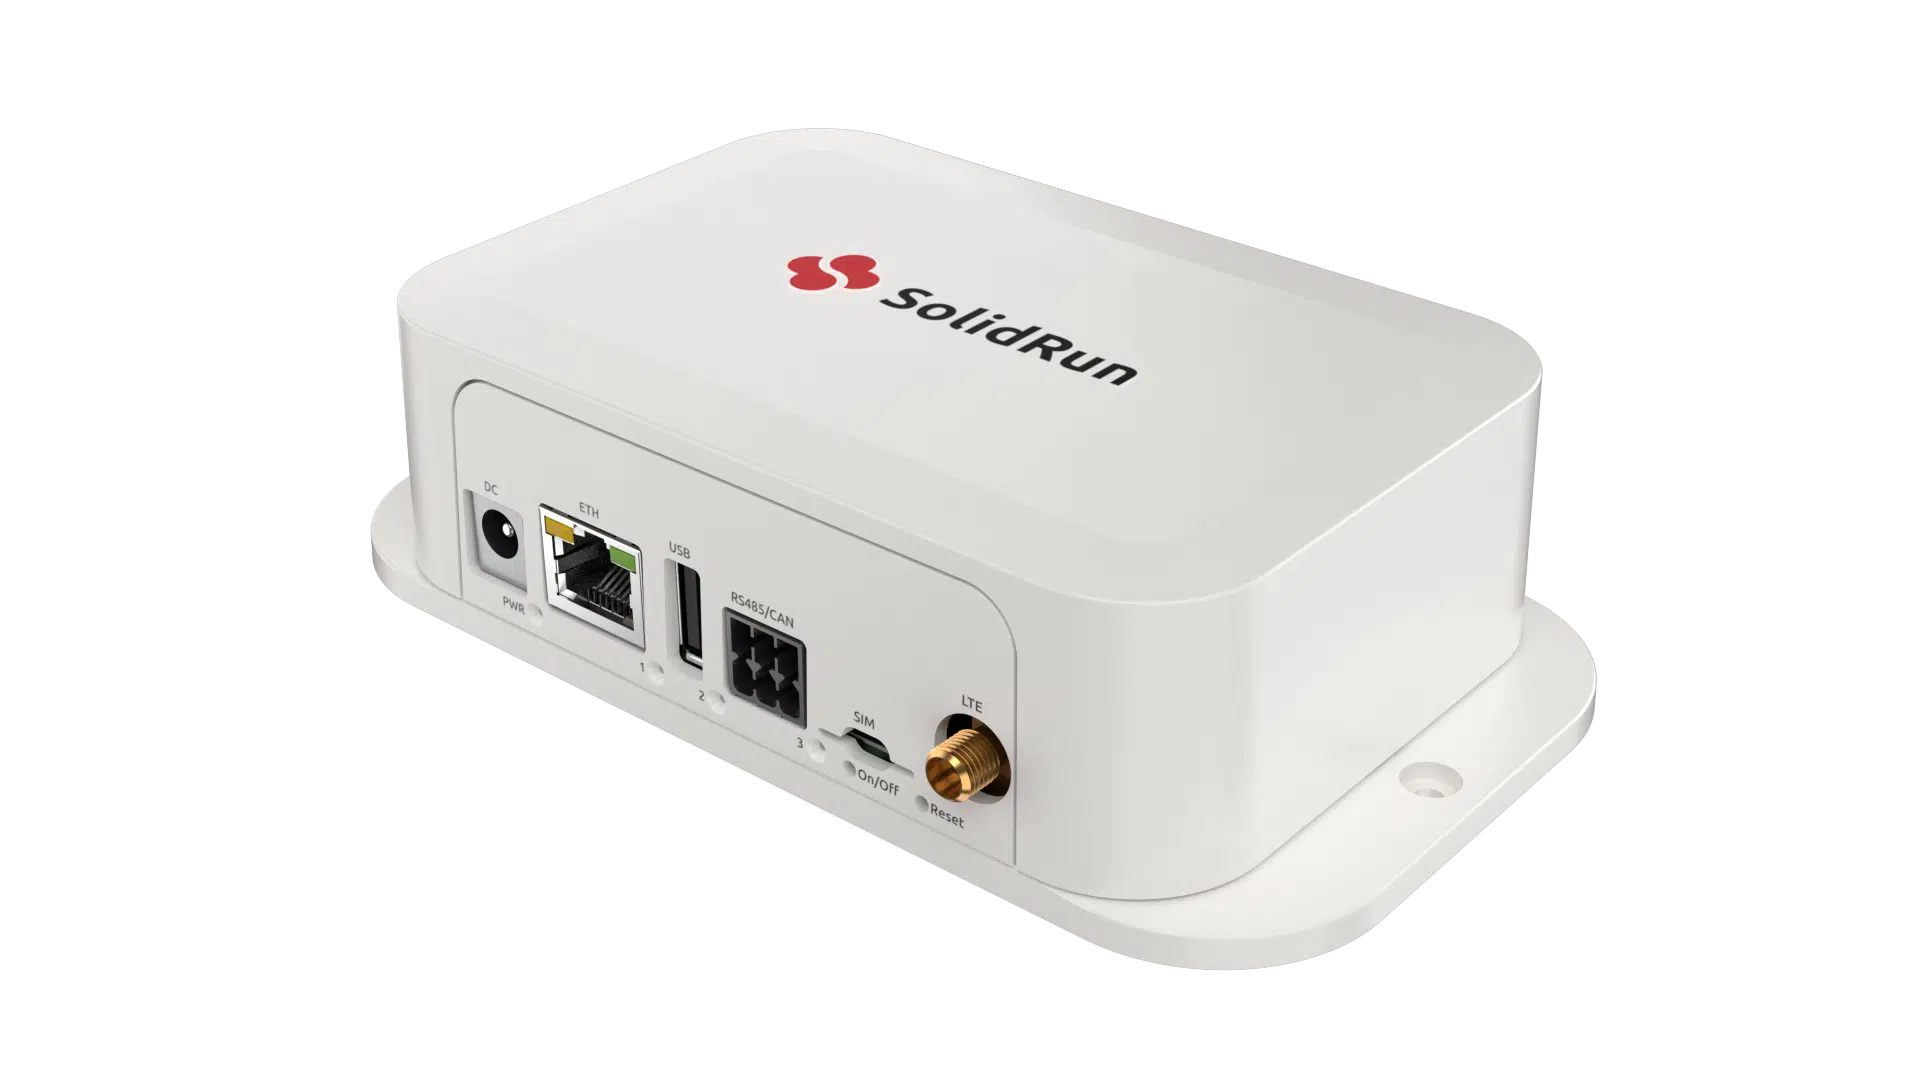
SolidSense N8 IoT Compact Edge Gateway is an enterprise Internet of Things gateway designed for servicing a local network of IoT devices with a range of solutions and business applications. SolidSense is the ultimate IoT M2M solution, with high-end connectivity options.
Based on NXP i.MX8M Nano processors, , SolidSense is a feature-rich edge platform designed to provide flexibility for developers and OEMs in implementing an almost endless range of IoT solutions.
Main features
SoC: NXP i.MX 8M Nano Arm Cortex A53 Single core @1500MHz + Cortex M7@650MHz
Memory: 1GB DDR4
Storage: 8GB eMMC
Temperature: Commercial (0C to 50C)
OS: Linux
Hardware Setup
Product Specifications
SolidSense N8 IoT Compact BLE | SolidSense N8 IoT Compact LTE BLE | SolidSense N8 IoT Compact Extended | SolidSense N8 IoT Compact Extended LTE | |
|---|---|---|---|---|
I/Os | 1 x USB 2.0 | 1 x USB 2.0 | 1 x RS485 | 1 x RS485 |
Networking | 1 x Ethernet RJ45 10/100/1000 | 1 x Ethernet RJ45 10/100/1000 | 1 x Ethernet RJ45 10/100/1000 | 1 x Ethernet RJ45 10/100/1000 |
Processor | NXP i.MX 8M Nano Arm Cortex A53 Single core @1500MHz + Cortex M7@650MHz | NXP i.MX 8M Nano Arm Cortex A53 Single core @1500MHz + Cortex M7@650MHz | NXP i.MX 8M Nano Arm Cortex A53 Single core @1500MHz + Cortex M7@650MHz | NXP i.MX 8M Nano Arm Cortex A53 Single core @1500MHz + Cortex M7@650MHz |
Memory & Storage | 1GB DDR4 | 1GB DDR4 | 1GB DDR4 | 1GB DDR4 |
Misc. | Programmable LEDs | Programmable LEDs | Programmable LEDs | Programmable LEDs |
Development and Debug interfaces | Console port (internal) | Console port (internal) | Console port (internal) | Console port (internal) |
Power | 9V-36V | 9V-36V | 9V-36V | 9V-36V |
Expansion card I/Os ( * ) | 1 x internal expansion header | 1 x internal expansion header | 1 x internal expansion header | 1 x internal expansion header |
Temperature | 0°C to 50°C | 0°C to 50°C | 0°C to 50°C | 0°C to 50°C |
Dimensions | 150 x 85 x 40mm | 150 x 85 x 40mm | 150 x 85 x 40mm | 150 x 85 x 40mm |
Enclosure | Plastic casing with internal antennas for WiFi-Bluetooth/BLE | Plastic casing with internal antenna for WiFi-Bluetooth. One SMA port for LTE. | Plastic casing with internal antenna for WiFi-Bluetooth | Plastic casing with internal antenna for WiFi-Bluetooth. One SMA port for LTE. |
| Info |
|---|
Please Note (*) Only accessible with case open. |
.png?version=1&modificationDate=1639934001802&cacheVersion=1&api=v2&width=442)
| Ui button | ||||||
|---|---|---|---|---|---|---|
|
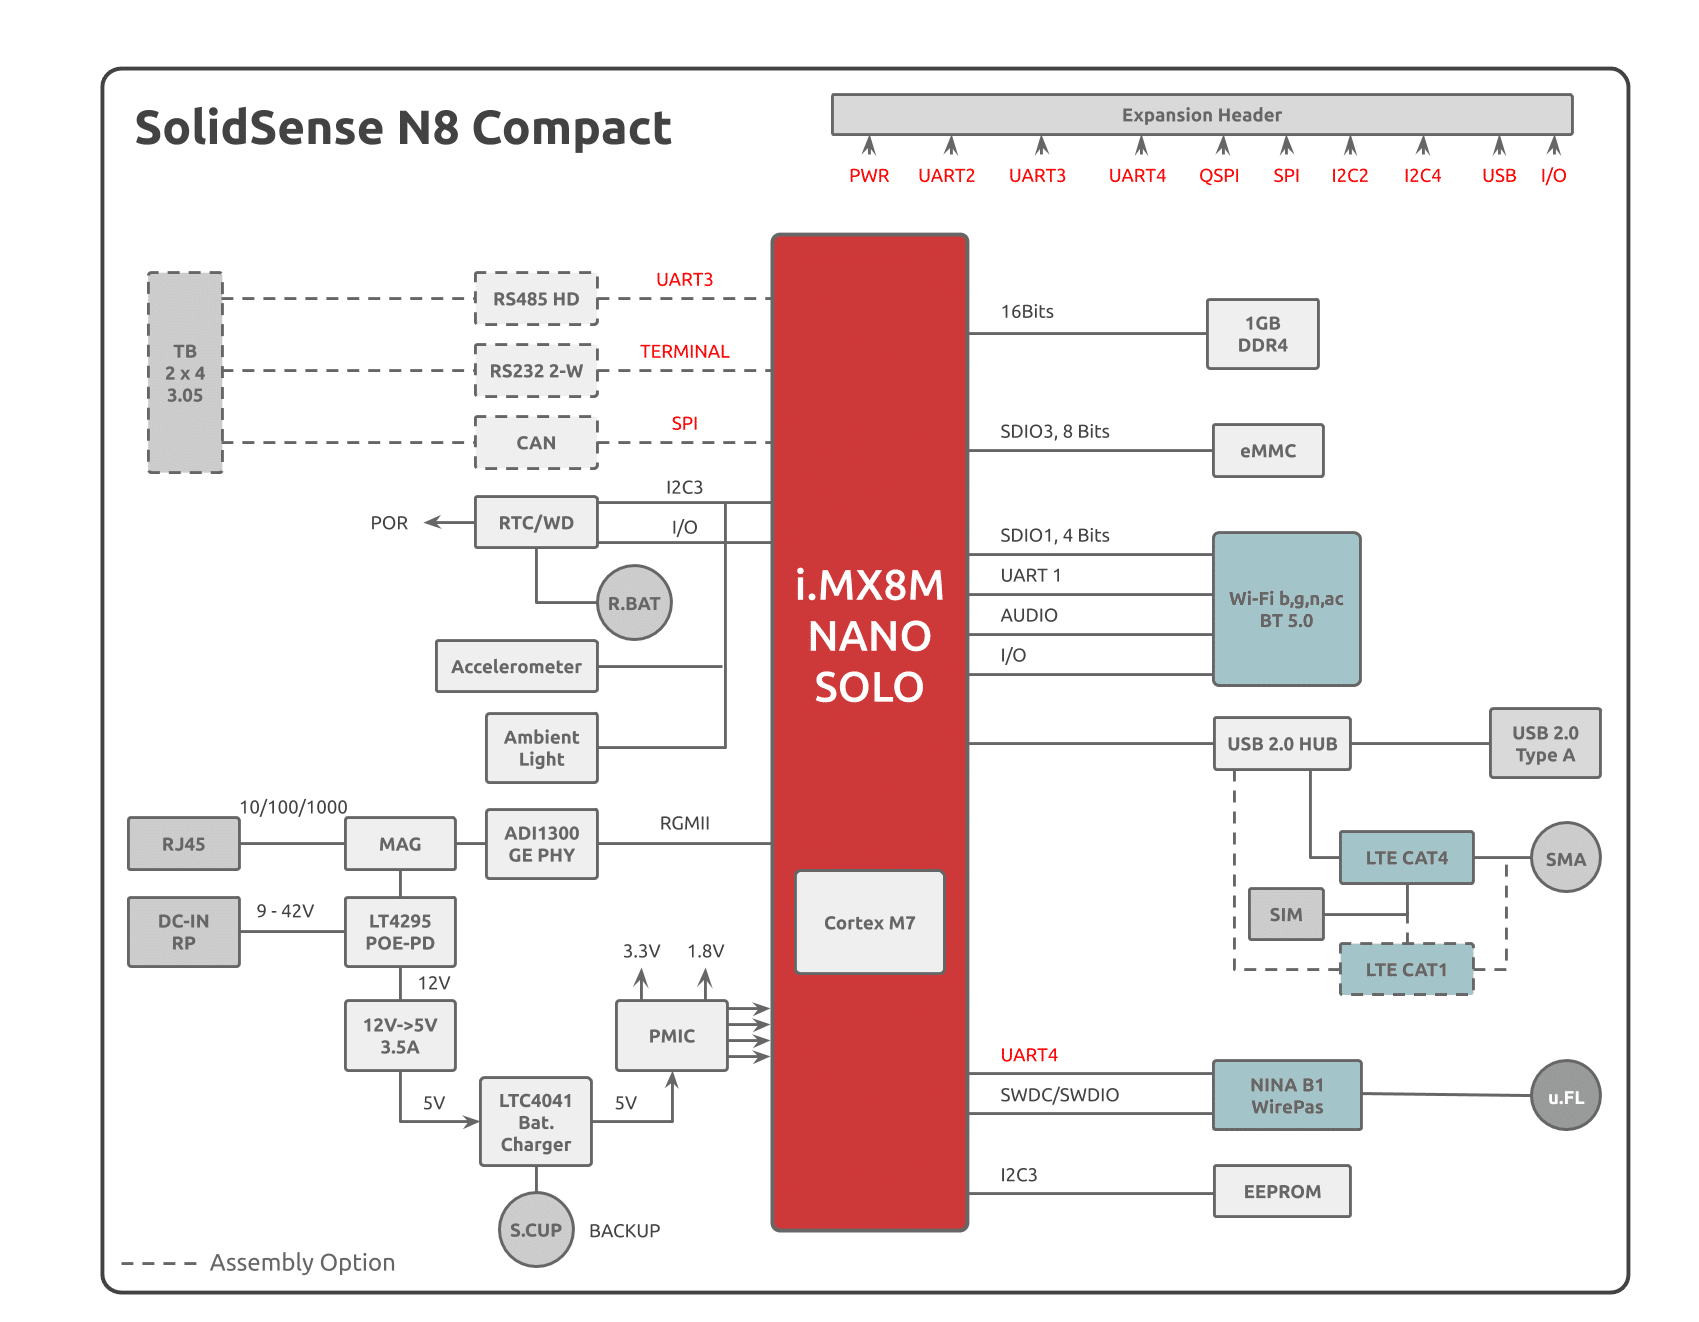
Block Diagram
The following figure describes the SolidSense N8 Compact Edge Block Diagram.
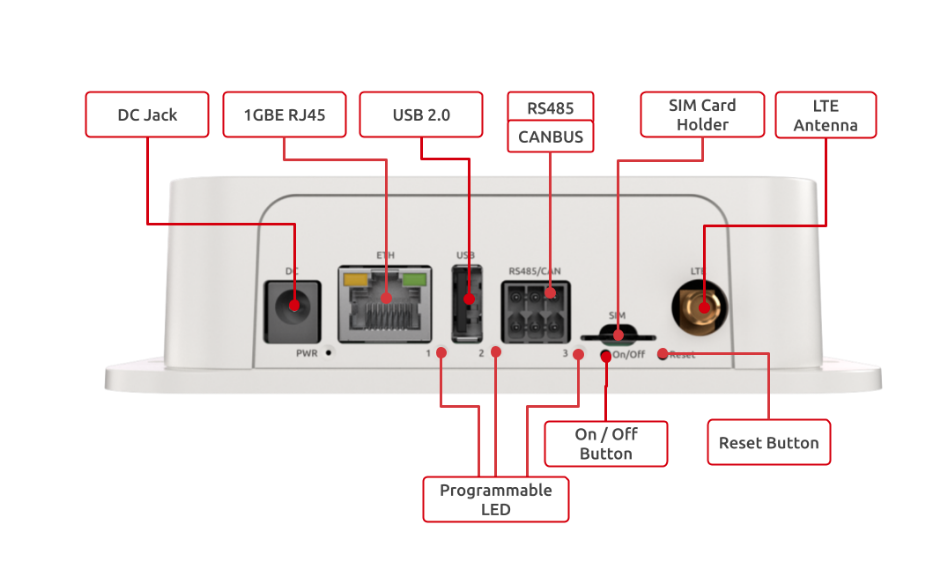
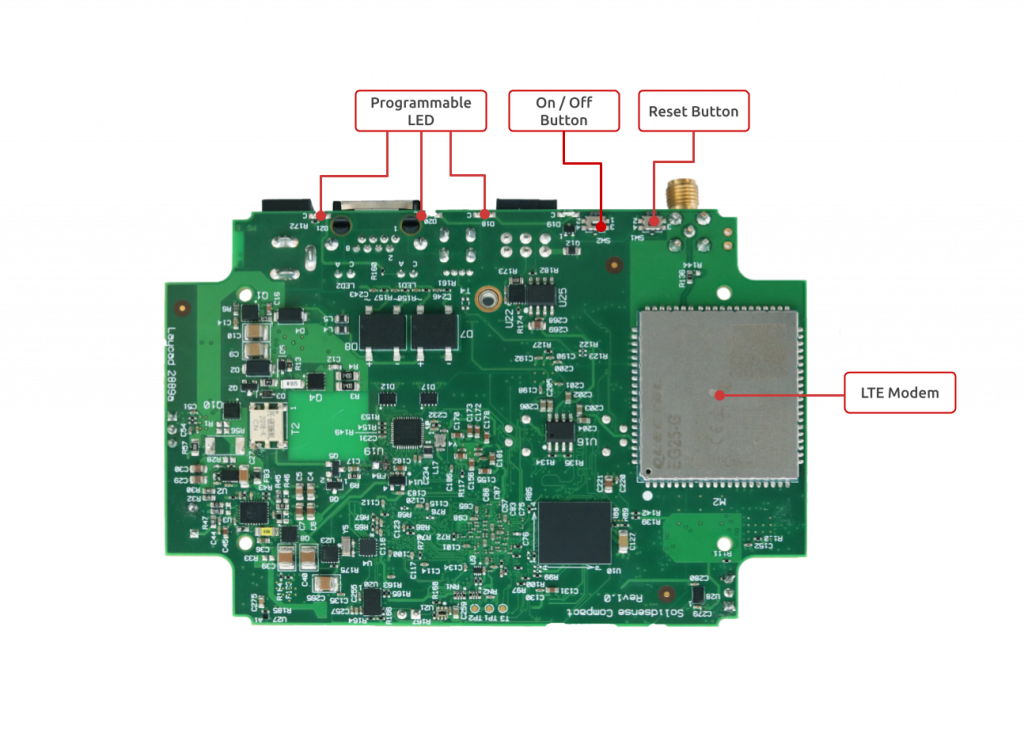
Visual features overview
Please see below the features overview of the front side of the product.
Note
The unit has two Dual-Band Antennas (for WIFI Module and U-Blox): RF ANT 2.4GHZ/5.4GHZ FLAT PATCH .
The system can be used in 4 ways:
Ready to go SolidSense IoT platform (SolidSense Out-Of-the-Box) with Eclipse Kura Framework and Wirepas/Bluetooth Low Energy MQTT gateways built-in applications. Configure the gateway via Kura and that’s it you can directly have your data forwarded to your cloud application.
Developing your own application or add-on on top of the platform. Simple additions can be developed via Python 3.7 using the pre-installed packages. For more sophisticated development, a Docker infrastructure is ready to host your containers.
Create your own SolidSense image derived from SolidSense OOB.
From bare metal. You can create your own Linux image starting from SolidRun BSP. The support for these developments are not covered in the SolidSense section.
| Tip |
|---|
The product comes with a SolidSense built in software and ready to go. |
Power Connection
Connect your power adaptor to the DC jack (12-36 V), and then connect the adaptor to mains supply.
| Tip |
|---|
A green LED will light up at the front panel. This is an indication of your device working. |
Network Configuration
For managing your IoT gateway, monitor the gateway status, and manage the network configuration, you can refer to Configuring SolidSense networking with Kura .
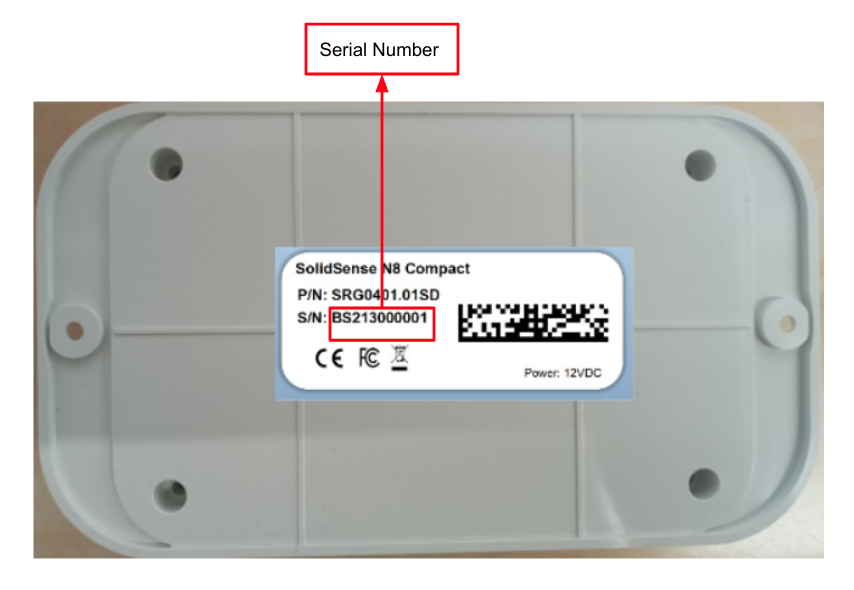
Please see below picture to get the serial number for SSID of the network.
Wirepas
If you are using SolidSense as a Wirepas gateway you can directly configure your Wirepas gateway by referring to Configuring and testing the Wirepas gateway software .
For flashing or re-flashing wirepas sinks, please refer to Flashing or Re-flashing Wirepas sinks on SolidSense gateway (V0.9 and up) .
CanBus and RS485
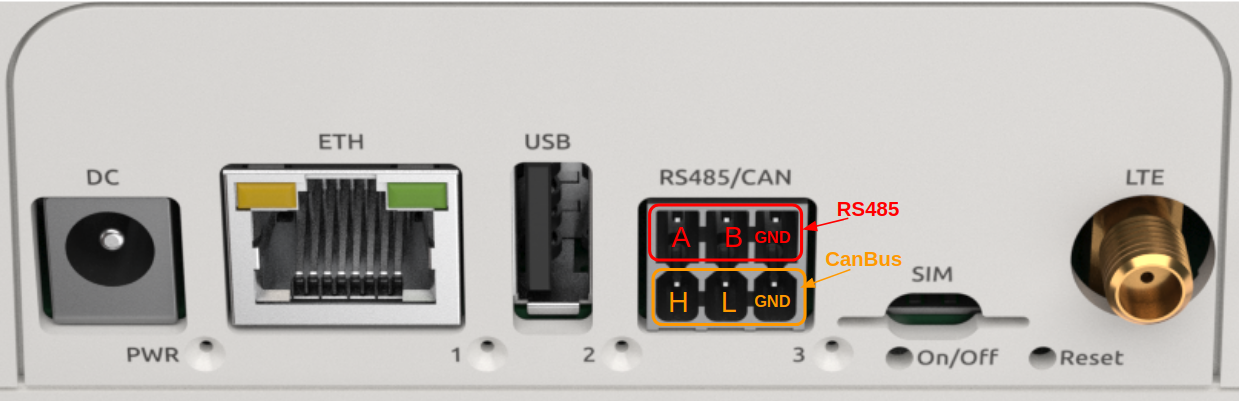
Connector Description
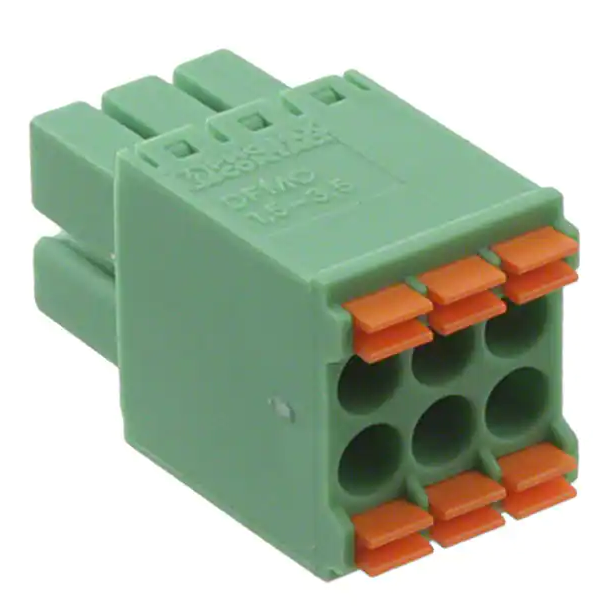
6 Position Terminal Block Plug, Female Sockets 0.138" (3.50mm) - 180° Free Hanging (In-Line) like this connector.
CanBUS and RS485 Test
For testing your CANBus and RS-485 interfaces, please refer to SolidSense N8 Compact RS485 and CAN bus .
Bluetooth
1. For showing all Bluetooth devices, run the following:
| Code Block |
|---|
hciconfig -a |
2. Choose a device, and turn it on:
| Code Block |
|---|
hciconfig hci0 up |
3. Set up the Bluetooth name:
| Code Block |
|---|
hciconfig hci0 name 'SolidRun_Ble' |
4. Make your Bluetooth detectable by other devices:
| Code Block |
|---|
hciconfig hci0 piscan |
5. If you want to connect to other devices:
Start by scanning for other Bluetooth devices:
| Code Block |
|---|
hcitool scan |
Choose a MAC address and connect :
| Code Block |
|---|
rfcomm connect 0 $MAC 10 & |
You can check the communication between the devices by writing :
| Code Block |
|---|
l2ping -c 4 $MAC |
Graceful Boot Application
Our source code https://github.com/SolidRun/imx8mp_build/tree/imx8mn includes a graceful boot/reboot application which prevents corruptions of the filesystem due to power loss.
Hardware used by application
5[F] Supercapacitor which can supply power to the board for ~10-15 seconds.
Supercapacitor backup power manager IC.
I/O expander, connected to the backup power manager IC.
All these components are part of the board (if assembled).
How the application works
The kernel polls the I/O expander, once the kernel detects that the external power is off (signal from the supercapacitor backup power manager IC), it throws "RESTART" keys.
The keys are catched by input-event-daemon, then the daemon reboots the system.
On boot, U-boot polls the I/O expander and won't boot until:
An external power source is connected to the board.
The capacitor charge is >90% (so it will last for the boot process, until the daemon will be started).
Once these requirement meet, U-boot will boot the system.
If you are using our Kernel and U-boot, but you are not using our Buildroot, make sure you have a daemon to catch the thrown keys.
Modifying the application
Kernel part
In order to remove the kernel part, remove "gpio_keys_polled" node from devicetree.
The devicetree path is: build/linux-imx/arch/arm64/boot/dts/freescale/imx8mn-compact.dts
U-boot part
The default configuration for the U-boot part is checking that an external power source is connected and the capacitor charge is >90%.
This is configured in the bootcmd environment parameter: check_power_connection 2;.
The argument "2" indicates that the extenral power connection and capacitor charge should be checked.
If you just want to check the power connection, change the argument to "1" check_power_connection 1;.
If you want to cancel the power check, you can delete the check_power_connection part from the bootcmd environment parameter.
Cover Removal
For removing the enclosure , please follow the below instructions:
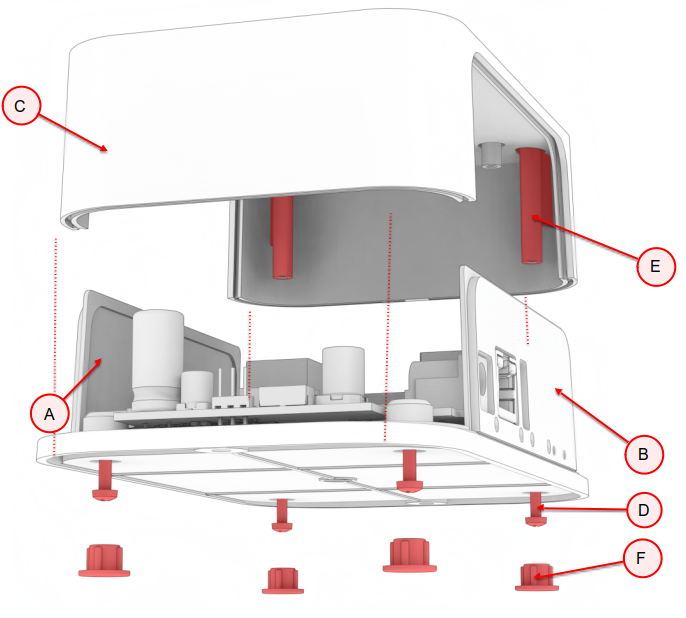
Remove 4 rubber feet (F) from screw holes in base.
Remove 4 Enclosure self-tapping screw (D) tightened to Top cover bosses (E).
Remove Top cover (C).
Remove Front cover (A) and Rear cover (B).
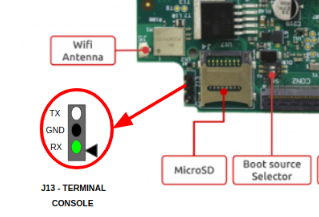
Hardware interfaces
Please see below the features overview of the connector side of the Compact.
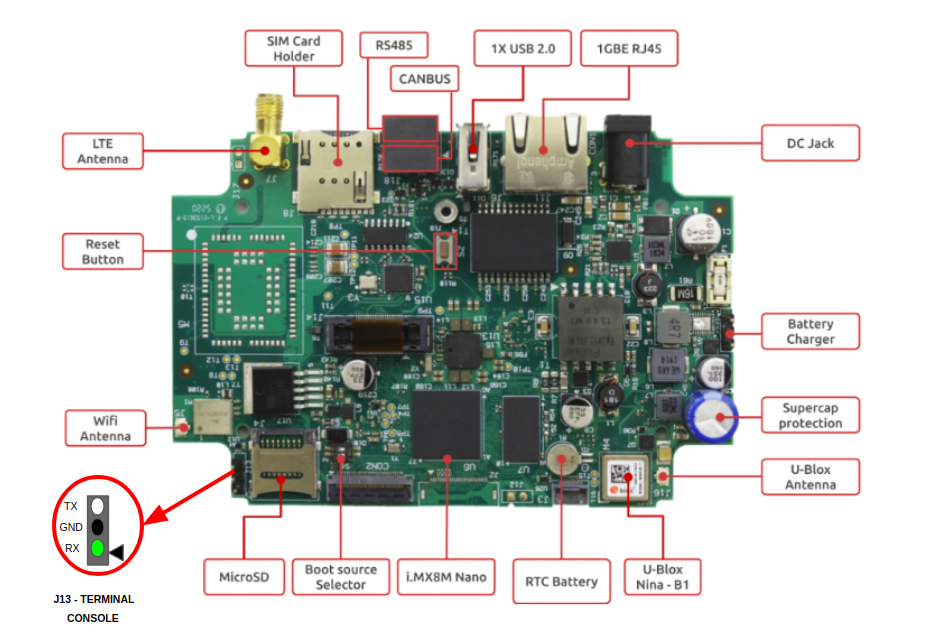
Print side connector overview of the Compact.
Boot Select
Before powering up the board for the first time it is recommended to select the boot media. In order to configure the boot media to MicroSD, please set the S1 switch to match the first option from the following table:
Switch 1 | Switch 2 | |
SD | ON | ON |
eMMC | OFF | ON |
Serial connection
Please connect the UART cable to the pins on connector J13 as shown in the above connector side picture under HW interfaces, then you can refer to Serial Connection for installing necessary serial connection software in Linux/Windows.
Once you have installed the necessary serial connection software, reset your device and you should be able to see the following:
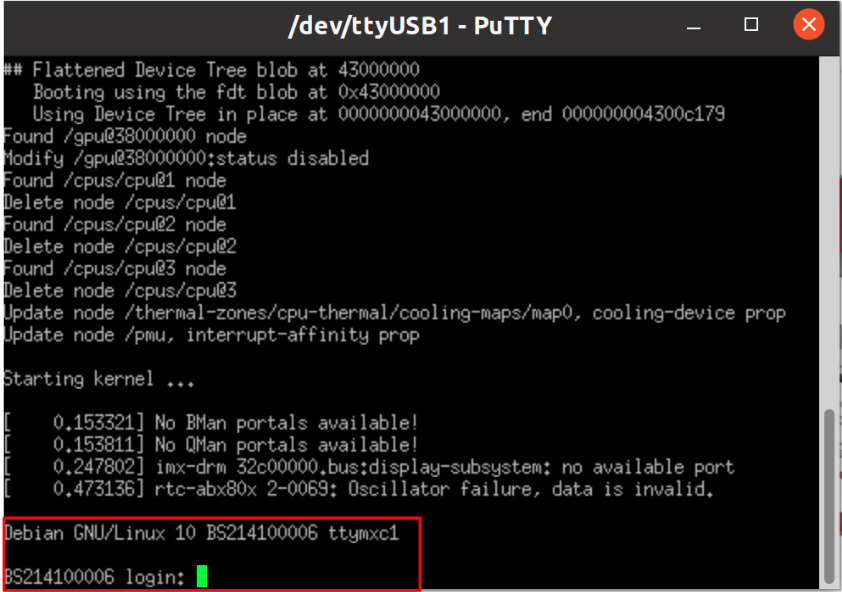
In order to be able to log in, please insert ‘solidsense’ as username and ‘aiPh2eim’ as password.
List Of Supported OS


Build from sources
Support
Please follow our SolidSense Support Overview page.
| Ui button | ||||||
|---|---|---|---|---|---|---|
|
Related Articles
| Filter by label (Content by label) | ||
|---|---|---|
|